Soft, Buttery, and Infused with Irresistible Garlic Flavor
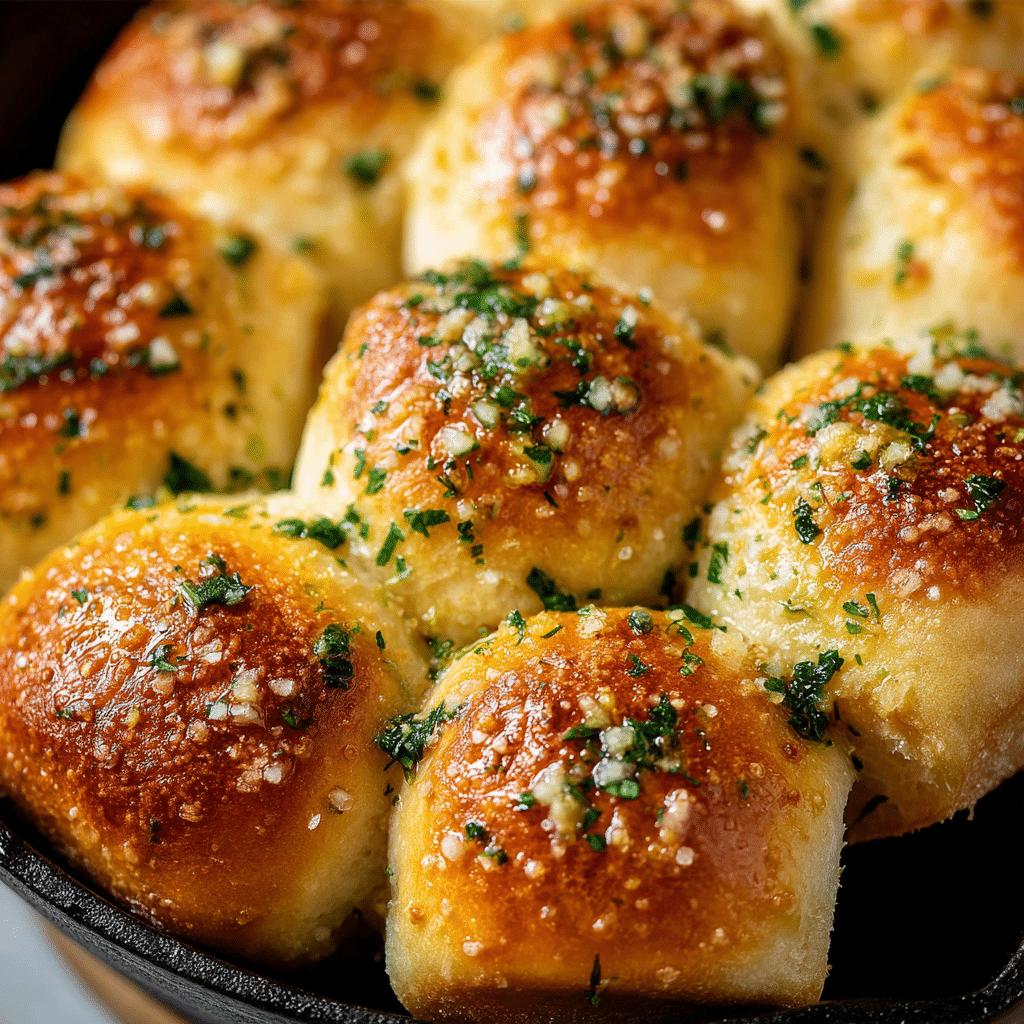
Few things are as comforting as the aroma of freshly baked bread wafting through a kitchen — especially when that bread is infused with garlic butter, flecked with fresh parsley, and golden on top. Garlic Bread Rolls are the ultimate crowd-pleaser, combining the heartwarming texture of homemade bread with the bold, savory flavor of classic garlic butter.
Whether served alongside soups, pasta, or as the star of your dinner table, these rolls deliver everything you love about garlic bread — but softer, fluffier, and even more indulgent. Each bite melts in your mouth, with the perfect balance of buttery richness and gentle garlic fragrance.
This recipe transforms basic pantry ingredients — flour, milk, butter, yeast, and garlic — into something extraordinary. The dough is enriched with milk and egg for tenderness, while the garlic butter brushed on top adds a luscious, restaurant-quality finish.
Even if you’ve never baked bread before, this recipe walks you through each step with precision and ease. The result? Golden, pull-apart rolls with a pillowy interior and a perfectly crisped crust — ideal for weeknight dinners, family gatherings, or simply satisfying that craving for homemade comfort food.
Ingredients
For the Dough
- 4 ½ tablespoons unsalted butter
- 2 tablespoons minced garlic
- 3 ½ cups + 1 tablespoon all-purpose flour (see note on measuring below)
- 3 tablespoons chopped fresh parsley
- 1 tablespoon granulated sugar
- 2 ¼ teaspoons instant yeast (1 standard packet)
- 1 teaspoon fine sea salt
- 1 cup whole or 2% milk, warmed to 110°F (43°C)
- 1 large egg, at room temperature
- 1 beaten egg, for brushing the tops before baking
For the Garlic Butter Topping
- 2 tablespoons unsalted butter
- 1 tablespoon minced garlic
- 1 tablespoon chopped fresh parsley
- Flaky sea salt, for finishing (optional but recommended)
Ingredient Notes
- Flour: For accuracy, spoon the flour into your measuring cup, then level it off with a knife — never scoop directly from the bag, as that can pack in too much flour and make the dough dense.
- Yeast: Instant yeast eliminates the need for proofing, but if you only have active dry yeast, you can dissolve it in warm milk with a pinch of sugar and let it sit for 5–10 minutes before mixing.
- Milk: Using warm milk (not hot) activates the yeast and ensures a soft, tender crumb. Whole milk gives the richest texture, but 2% works well too.
- Butter: Unsalted butter allows you to control the salt content. Melt it gently to avoid separating the milk solids.
- Garlic: Freshly minced garlic provides the most robust flavor, but you can substitute roasted garlic for a milder taste.
- Parsley: Fresh parsley adds brightness and a hint of color, balancing the richness of butter and garlic.
Preparation Method
Step 1: Prepare the Garlic Butter Base
In a small saucepan, melt 4 ½ tablespoons unsalted butter over medium heat. Add 2 tablespoons minced garlic and sauté for 1–2 minutes, just until fragrant — avoid browning the garlic, which can turn it bitter.
Remove from heat and stir in 3 tablespoons chopped fresh parsley. Let the mixture cool slightly. This infused butter will be partially mixed into the dough for flavor and used later to brush on top.
Step 2: Activate the Yeast (if using active dry yeast)
If using instant yeast, skip this step.
Otherwise, combine 1 cup warm milk (110°F) with 1 tablespoon sugar in a small bowl. Sprinkle the yeast over the surface, stir gently, and let it sit for 5–10 minutes, or until foamy. This ensures the yeast is alive and active.
Step 3: Mix the Dough
In a large mixing bowl (or the bowl of a stand mixer fitted with the dough hook), combine:
- 3 ½ cups all-purpose flour
- 1 teaspoon fine sea salt
- 2 ¼ teaspoons instant yeast (if not already activated separately)
Add:
- The warm milk
- 1 large egg
- The slightly cooled garlic-butter-parsley mixture
Stir with a wooden spoon or mix on low speed until a rough dough forms. Gradually add the remaining 1 tablespoon flour if the dough feels sticky.
💡 Tip: The dough should be soft and slightly tacky, but not overly sticky.
Step 4: Knead the Dough
If kneading by hand, transfer the dough to a lightly floured surface and knead for about 8–10 minutes, until smooth and elastic.
If using a stand mixer, knead with the dough hook on medium speed for 5–6 minutes.
To test if it’s ready, press the dough gently — it should spring back slightly. You can also perform the “windowpane test”: stretch a small piece between your fingers; if it forms a thin, translucent membrane without tearing, the gluten is well-developed.
Step 5: First Rise
Shape the dough into a ball and place it in a greased bowl. Cover with plastic wrap or a clean kitchen towel and let it rise in a warm, draft-free spot for 1 to 1 ½ hours, or until doubled in size.
🌡️ Tip: If your kitchen is cool, place the bowl in a slightly warm (but turned-off) oven, or near a sunny window to encourage rising.
Step 6: Shape the Rolls
Once the dough has doubled in volume, punch it down gently to release air bubbles.
Turn it onto a lightly floured surface and divide it into 12 equal portions (for large rolls) or 16 portions (for smaller dinner rolls).
Shape each portion into a smooth ball by tucking the edges underneath and rolling gently between your palms. Place the rolls evenly spaced in a greased 9×13-inch baking pan or on a parchment-lined baking sheet.
Cover lightly with a towel and let them rise again for 30–40 minutes, until puffy and nearly doubled.
Step 7: Preheat the Oven
During the second rise, preheat your oven to 375°F (190°C).
Step 8: Egg Wash and Bake
Brush the tops of the rolls with 1 beaten egg to give them a golden, glossy finish.
Bake for 18–22 minutes, or until the tops are a rich golden brown and the rolls sound hollow when tapped on the bottom.
🍞 Tip: For an extra-soft crust, cover the rolls loosely with foil after 15 minutes of baking to prevent over-browning.
Step 9: Prepare the Garlic Butter Topping
While the rolls are baking, make a quick garlic butter for finishing:
In a small saucepan, melt 2 tablespoons unsalted butter over low heat. Add 1 tablespoon minced garlic and cook for 30–45 seconds, just until aromatic. Stir in 1 tablespoon chopped parsley, then remove from heat.
Step 10: Brush and Serve
As soon as the rolls come out of the oven, brush them generously with the warm garlic butter topping. Sprinkle with flaky sea salt for extra flavor and texture.
Allow the rolls to cool for at least 10 minutes before serving.
The aroma will be irresistible — soft, buttery rolls with golden tops, each infused with layers of garlic flavor and herbaceous freshness.

Tips for Perfect Garlic Bread Rolls
- Use room-temperature ingredients. Cold milk or eggs can slow yeast activity and make the dough dense.
- Avoid over-kneading. Too much kneading can result in tough rolls. Stop once the dough is elastic and smooth.
- Don’t rush the rise. Proper proofing is essential for fluffy, airy rolls.
- Use real butter. Margarine lacks the richness that makes these rolls so irresistible.
- Experiment with herbs. Try adding rosemary, chives, or basil for a twist on the classic flavor.
- Double the garlic. For garlic lovers, increase the minced garlic by 50% — you’ll get even more aroma and flavor.
- Add cheese! Sprinkle shredded Parmesan or mozzarella before baking for cheesy garlic bread rolls.
Variations
- Cheesy Garlic Rolls: Sprinkle mozzarella and Parmesan between dough layers or over the top before baking.
- Herb Butter Rolls: Add chopped basil, oregano, or rosemary to the garlic butter.
- Spicy Garlic Rolls: Mix a pinch of chili flakes into the butter for a gentle kick.
- Whole Wheat Option: Replace half of the all-purpose flour with whole wheat flour for a nuttier flavor.
- Stuffed Rolls: Fill each dough ball with a cube of cheese or roasted garlic before shaping.
Serving Suggestions
Garlic Bread Rolls are wonderfully versatile. Try pairing them with:
- Soups and Stews: Especially creamy tomato soup, mushroom soup, or minestrone.
- Pasta Dishes: They’re the perfect side for spaghetti, lasagna, or Alfredo pasta.
- Roasted Meats: Serve with grilled chicken, steak, or roast beef.
- Holiday Meals: Add them to your Thanksgiving or Christmas dinner spread.
- Simple Snack: Enjoy warm with marinara or cheese dip for a cozy treat.
Storing and Reheating
To Store:
Keep cooled rolls in an airtight container or zip-top bag at room temperature for up to 2 days.
To Refrigerate:
Store in the fridge for up to 5 days. Reheat before serving to refresh their softness.
To Freeze:
Once cooled, freeze rolls in a freezer-safe bag for up to 2 months. Thaw overnight at room temperature.
To Reheat:
Warm in a 300°F (150°C) oven for 8–10 minutes. Brush lightly with butter before serving to restore that fresh-baked shine.
Nutritional Information (Per Roll, Approximate)
| Nutrient | Amount |
|---|---|
| Calories | 210 kcal |
| Total Fat | 8 g |
| Saturated Fat | 4.5 g |
| Carbohydrates | 27 g |
| Protein | 5 g |
| Sodium | 190 mg |
| Fiber | 1 g |
Frequently Asked Questions (FAQs)
1. Can I make the dough ahead of time?
Yes! Prepare the dough and let it rise once. Punch it down, cover tightly, and refrigerate overnight. The next day, shape the rolls, let them rise again, and bake as directed.
2. What if I don’t have instant yeast?
You can use active dry yeast — just dissolve it in warm milk with sugar and let it foam before adding to the dough.
3. Can I make these rolls vegan?
Absolutely. Substitute plant-based milk, vegan butter, and omit the egg (replace with 1 tablespoon olive oil).
4. How do I know when the rolls are done?
They should be golden brown on top, sound hollow when tapped on the bottom, and register 190°F (88°C) internally.
5. Can I add cheese on top?
Yes — shredded mozzarella, Parmesan, or cheddar melt beautifully on these rolls. Add during the last 5 minutes of baking.
6. How do I make them extra garlicky?
Use roasted garlic in addition to minced garlic in the butter for a deeper, caramelized flavor.
7. My rolls didn’t rise properly. What went wrong?
Common causes include old yeast, cold ingredients, or too short a proofing time. Ensure your yeast is fresh and your environment warm.
8. Can I make smaller rolls for appetizers?
Yes. Divide the dough into 20–24 pieces and reduce the baking time to 12–14 minutes.
9. How can I keep the rolls soft?
Brush with butter immediately after baking and cover loosely with foil or a kitchen towel while cooling.
10. Can I flavor the dough itself?
Certainly. Mix in dried herbs, shredded cheese, or even a touch of onion powder for added depth.
Conclusion
Homemade Garlic Bread Rolls are everything comfort food should be — warm, aromatic, buttery, and deeply satisfying. They elevate any meal and fill your kitchen with the kind of aroma that draws everyone to the table before dinner is even served.
The magic lies in the combination of soft, milk-enriched dough and fragrant garlic butter brushed generously over each roll. Whether you’re serving them as a side dish, appetizer, or centerpiece, these rolls deliver a bakery-quality experience with the heart of home cooking.
Once you’ve tasted the golden crust and tender crumb of these garlic bread rolls, you may never go back to store-bought again. Bake them fresh, share them with family, and savor every buttery, garlicky bite.
Print
Garlic Bread Rolls
- Total Time: 2 hours 15 minutes
- Yield: 12 rolls
- Diet: Vegetarian
Description
These soft, golden Garlic Bread Rolls are buttery, fluffy, and bursting with fresh garlic flavor. Perfect as a side for pasta, soups, or holiday dinners, they’re brushed with garlicky parsley butter for an irresistible aroma and taste. Every bite melts in your mouth with savory comfort.
Ingredients
- 4 1/2 tablespoons unsalted butter
- 2 tablespoons minced garlic
- 3 1/2 cups + 1 tablespoon all-purpose flour (*see notes below for measuring*)
- 3 tablespoons chopped fresh parsley
- 1 tablespoon granulated sugar
- 2 1/4 teaspoons instant yeast
- 1 teaspoon fine sea salt
- 1 cup whole or 2% milk, warmed to 110°F (43°C)
- 1 large egg, room temperature
- 1 beaten egg, for brushing the tops
For the Garlic Butter
- 2 tablespoons unsalted butter
- 1 tablespoon minced garlic
- 1 tablespoon chopped fresh parsley
- Flaky sea salt, for finishing
Instructions
- Prepare the Garlic Butter Base: In a small skillet, melt 4 1/2 tablespoons of butter over medium heat. Add 2 tablespoons of minced garlic and sauté until fragrant, about 30–45 seconds. Remove from heat and set aside to cool slightly.
- Mix the Dough: In a large mixing bowl, combine warm milk, sugar, and yeast. Let sit for 5 minutes until slightly foamy. Add in the egg, salt, cooled garlic butter, and 3 1/2 cups of flour. Mix until a soft dough forms.
- Knead the Dough: Knead on a lightly floured surface for about 8–10 minutes (or with a stand mixer for 5–6 minutes) until smooth and elastic. If dough is too sticky, add up to 1 tablespoon more flour.
- First Rise: Transfer dough to a greased bowl, cover with a damp towel or plastic wrap, and let rise in a warm place until doubled in size, about 1 to 1 1/2 hours.
- Shape the Rolls: Punch down dough and divide into 12 equal pieces. Shape each piece into a smooth ball and place them on a parchment-lined baking pan, spaced evenly apart.
- Second Rise: Cover and let rise again for 30–45 minutes, or until puffy.
- Bake: Preheat oven to 375°F (190°C). Brush tops of rolls with beaten egg. Bake for 18–22 minutes, until golden brown.
- Make the Garlic Butter Topping: While rolls bake, melt 2 tablespoons butter with 1 tablespoon garlic and 1 tablespoon parsley in a small saucepan.
- Finish: As soon as rolls come out of the oven, brush them generously with the warm garlic butter. Sprinkle with flaky sea salt and extra parsley if desired. Serve warm and enjoy!
Notes
- Use a kitchen scale for precise flour measurement. If using cups, spoon flour into the cup and level with a knife—don’t scoop directly from the bag.
- For a cheesy twist, sprinkle shredded mozzarella or parmesan on top before baking.
- These rolls freeze well! Store cooled rolls in a freezer bag up to 2 months; reheat in the oven before serving.
- Prep Time: 25 minutes (plus 90 minutes rise time)
- Cook Time: 20 minutes
- Category: Bread, Side Dish
- Method: Baked
- Cuisine: American, Italian-inspired


