
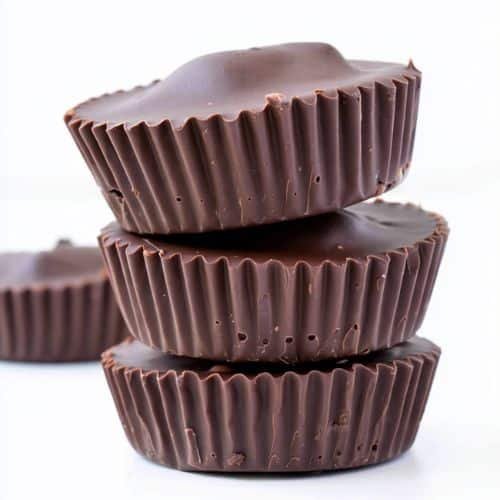
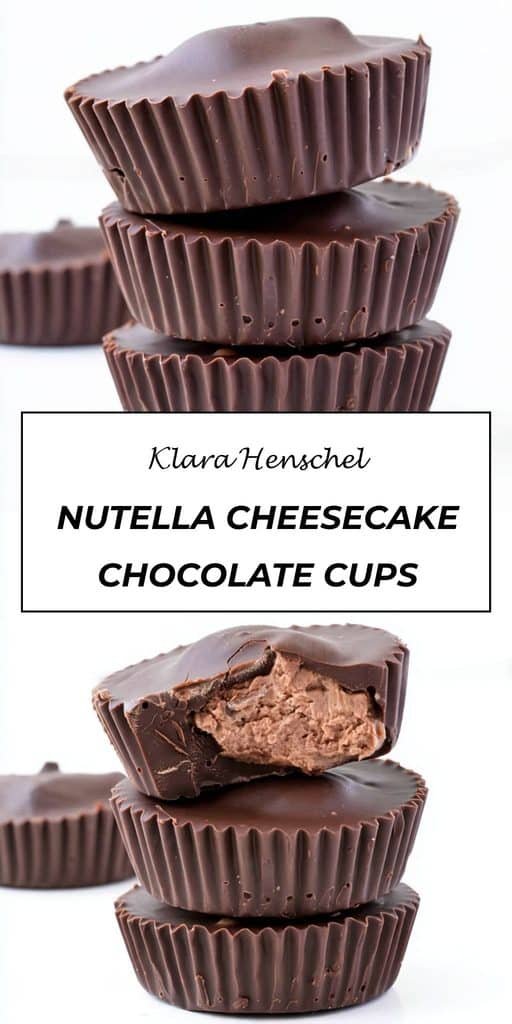
If you love the combination of rich chocolate and creamy Nutella cheesecake, these Nutella Cheesecake Chocolate Cups are a dessert you won’t want to miss. Each little chocolate cup has a crisp, snappy chocolate shell wrapped around a smooth, velvety Nutella cheesecake filling.
They’re surprisingly easy to make and require no baking. Simply melt the chocolate, whip together the creamy filling, layer everything in cupcake liners, and let the refrigerator do the rest. With just a handful of ingredients and a little chilling time, you can have an impressive homemade dessert ready for parties, holidays, afternoon treats, or whenever a chocolate craving strikes.
Why You’ll Love This Recipe
- No-bake dessert: No need to turn on the oven.
- Easy to make: Simple ingredients and straightforward assembly make these chocolate cups beginner-friendly.
- Rich and creamy: The Nutella cheesecake center is smooth, luscious, and packed with hazelnut-chocolate flavor.
- Perfectly portioned: Each cup is an individual dessert that’s easy to serve.
- Make-ahead friendly: Prepare them in advance and keep them chilled until you’re ready to serve.
Ingredients
- Cream cheese: Creates the smooth, creamy base of the cheesecake filling. Bring it to room temperature so it blends easily.
- Nutella: Adds rich chocolate-hazelnut flavor and sweetness to the cheesecake center.
- Vanilla extract: Enhances the chocolate and hazelnut flavors.
- Sour cream: Adds a subtle tang and helps make the cheesecake filling extra smooth and creamy.
- Dark chocolate: Forms the crisp outer shell that surrounds the cheesecake filling. You can also use milk chocolate or a combination of chocolates.
How to Make Nutella Cheesecake Chocolate Cups
Prepare the Cheesecake Filling
Start by lining a 12-hole muffin tray with cupcake liners.
Place the room-temperature cream cheese in a large mixing bowl and beat with an electric mixer for about 1 minute, or until completely smooth and creamy.
Add the Nutella and vanilla extract, then beat again until well combined. Add the sour cream and mix briefly until the filling is smooth and silky.
Using room-temperature cream cheese is important here because cold cream cheese can leave small lumps in the filling.
Melt the Chocolate
Place the dark chocolate in a heatproof bowl. Microwave it in short intervals, stirring every 30 seconds, until completely melted and smooth.
Be careful not to overheat the chocolate. Stirring frequently helps distribute the heat and prevents the chocolate from scorching.
If you prefer a slightly sweeter shell, you can use milk chocolate or combine equal amounts of dark and milk chocolate.
Build the Chocolate Cups
Spoon approximately 1–2 teaspoons of melted chocolate into the bottom of each cupcake liner.
Tilt or gently move the chocolate around if necessary to make sure the entire base is covered.
Add approximately 1 tablespoon of Nutella cheesecake filling to the center of each cup. Keep the filling away from the edges of the liner so there is enough room for the chocolate shell to completely surround it.
Cover the Filling
Generously spoon more melted chocolate over each cheesecake filling.
Make sure the filling is completely covered and the chocolate reaches the edges, creating a sealed chocolate shell.
Repeat with the remaining chocolate and cheesecake mixture until you have 12 chocolate cups.
Chill Until Set
Place the chocolate cups in the refrigerator for approximately 2 hours, or until the chocolate has completely set.
Once firm, they’re ready to serve. Keep the finished cups refrigerated or store them in the freezer for longer-term storage.
Tips for Success
- Use room-temperature cream cheese: This makes the filling much easier to beat until smooth.
- Melt chocolate slowly: Microwave in short bursts and stir frequently to avoid overheating.
- Don’t let the filling touch the liners: Leaving a border around the cheesecake mixture gives you enough room to seal it completely with chocolate.
- Cover the filling completely: Any exposed cheesecake filling can make the cups harder to remove and store.
- Use good-quality chocolate: Since chocolate makes up the outer shell, choose a chocolate you genuinely enjoy eating.
- Chill thoroughly: Give the cups enough time to become firm before removing them from the liners.
- Keep them cold: The cheesecake filling is best kept refrigerated or frozen.
Equipment Needed
- 12-hole muffin tray: Provides the shape for the individual chocolate cups.
- Cupcake liners: Make assembly easier and help with serving.
- Large mixing bowl: Used to prepare the cheesecake filling.
- Electric mixer: Makes it quick and easy to achieve a smooth filling. A hand whisk can work, although it requires more effort.
- Heatproof bowl: Needed for safely melting the chocolate.
- Microwave: The easiest method for melting the chocolate. You can also use a double boiler.
Recipe Variations
Milk Chocolate Nutella Cups
Replace the dark chocolate shell with milk chocolate for a sweeter, creamier chocolate flavor. This version is especially appealing if you prefer a milder chocolate taste.
Dark Chocolate Cheesecake Cups
Use a rich dark chocolate shell and choose a darker chocolate-hazelnut spread for a more intense, less-sweet dessert.
White Chocolate Nutella Cups
Use melted white chocolate for the shell to create a beautiful contrast with the creamy Nutella cheesecake center. The result is especially pretty for holiday dessert tables.
Mini Cheesecake Chocolate Bites
For smaller bite-sized treats, use a mini muffin tray and mini cupcake liners. Reduce the amount of chocolate and filling used in each cup and check them while chilling.
Serving Suggestions
These homemade Nutella Cheesecake Chocolate Cups are delicious straight from the refrigerator, but you can make them even more special with a few simple finishing touches.
Serve them with:
- Fresh strawberries or raspberries
- A dusting of cocoa powder
- Chopped toasted hazelnuts
- A drizzle of melted chocolate
- Whipped cream
- Chocolate shavings
- A scoop of vanilla ice cream
For parties, arrange the chocolate cups on a dessert platter and add a few fresh berries around them for a simple but elegant presentation.
FAQs
Do I need to bake these cheesecake cups?
No. These are completely no-bake Nutella cheesecake cups. The chocolate shell sets in the refrigerator while the cheesecake filling remains creamy and smooth.
Can I use milk chocolate instead of dark chocolate?
Absolutely. Dark chocolate provides a nice contrast to the sweet Nutella filling, but milk chocolate works well if you prefer a sweeter dessert. You can also use a combination of dark and milk chocolate.
Why should the cream cheese be at room temperature?
Room-temperature cream cheese blends much more easily with the Nutella and sour cream. This helps you achieve a smooth filling without lumps.
How long do Nutella Cheesecake Chocolate Cups last?
Store them in an airtight container in the refrigerator and enjoy them while they remain fresh and firm. They can also be stored in the freezer for longer-term storage.
Can I freeze these chocolate cups?
Yes. These chocolate cheesecake cups can be stored in the freezer. Allow them to soften slightly in the refrigerator before serving for the best texture.
How do I prevent the cheesecake filling from leaking out?
Make sure the first layer of chocolate completely covers the bottom of each liner. When adding the cheesecake filling, keep it away from the sides. Finally, cover the filling generously with enough melted chocolate to completely seal the top and edges.
Final Thoughts
These easy Nutella Cheesecake Chocolate Cups are proof that an impressive dessert doesn’t have to be complicated. With a crisp chocolate shell and a creamy, dreamy Nutella cheesecake center, every bite delivers the perfect combination of rich chocolate and luscious hazelnut flavor.
They’re wonderful for entertaining, easy enough for a weekend treat, and convenient to prepare ahead of time. Make a batch for your next gathering—or simply keep a few in the freezer for those moments when you need a little something sweet.
If you try these homemade Nutella cheesecake cups, experiment with your favorite chocolate combination and share how they turned out!
Print
Nutella Cheesecake Chocolate Cups
- Total Time: 2 hours 15 minutes
- Yield: 12 chocolate cups
- Diet: Vegetarian
Description
These easy Nutella Cheesecake Chocolate Cups have a crisp chocolate shell and a creamy Nutella cheesecake filling. They are a simple no-bake dessert that makes 12 delicious chocolate cups.
Ingredients
- 250 grams (1 and 1/4 cups) cream cheese, room temperature
- 150 grams (1/2 cup) Nutella
- 1/2 teaspoon vanilla extract
- 60 ml (1/4 cup) sour cream
- 525 grams (3 and 1/2 cups) dark chocolate
Instructions
- Line a 12-hole muffin tray with cupcake liners. In a large mixing bowl, add the cream cheese and beat with an electric mixer for 1 minute or until smooth and creamy. Add Nutella and vanilla and beat to combine. Add sour cream and beat briefly until smooth.
- Place chocolate in a heatproof bowl and microwave until melted and smooth, making sure to stir every 30 seconds.
- To assemble the chocolate cups, add approximately 1-2 teaspoons of melted chocolate into the bottom of each cupcake liner, ensuring it covers the entire base. Add a tablespoon of Nutella cheesecake mixture on top. Make sure the cheesecake mixture does not touch the side of the liner so there is room for the chocolate to completely cover the sides.
- Generously spoon more melted chocolate over the cheesecake mixture so it is completely covered. Repeat with the remaining chocolate and cheesecake mixture until you have 12 chocolate cups.
- Place the chocolate cups in the refrigerator for two hours or until set. Store in the refrigerator or freezer.
Notes
- Dark chocolate is recommended for the shell, or you can use a mix of half dark chocolate and half milk chocolate.
- You can use whichever type of chocolate you prefer.
- Store the finished chocolate cups in the refrigerator or freezer.
- Prep Time: 135 minutes
- Cook Time: 0 minutes
- Category: Dessert
- Method: No-Bake
- Cuisine: American