
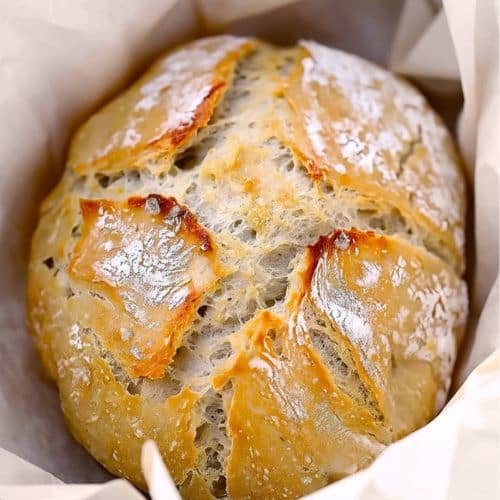
This Dutch Oven No-Knead Crusty Bread is an easy way to make bakery-style artisan bread at home with just 5 minutes of hands-on prep. There’s no kneading, no complicated shaping, and no special bread-making skills required. After a simple rise, the dough is baked in a hot Dutch oven to create a beautifully crisp, golden crust and a soft, chewy interior.
The secret is the Dutch oven, which traps steam as the bread bakes and helps create that classic crusty exterior. With just flour, yeast, salt, and water, you can have a gorgeous homemade loaf on the table in under 3 hours.
Whether you’re making bread for sandwiches, serving it alongside soup, or simply tearing off a warm piece with butter, this easy no-knead bread is a recipe worth keeping in your kitchen.
Why You’ll Love This Recipe
- Only 5 minutes of prep: Mix the dough and let time do most of the work.
- No kneading required: The long rise develops the dough without complicated techniques.
- Incredibly crusty: Baking in a preheated Dutch oven creates a beautiful golden crust.
- Soft and chewy inside: The finished loaf has a satisfying artisan-style texture.
- Simple ingredients: You only need flour, yeast, salt, and water.
- Make-ahead friendly: The dough can be refrigerated for several days, developing even more flavor as it rests.
Ingredients
- Warm water: Activates the yeast and brings the dough together. Aim for approximately 100°F.
- Yeast: Active dry, instant, or quick-rise yeast can be used.
- Fine-grain salt: Adds essential flavor to the bread and helps control yeast activity.
- All-purpose or bread flour: Forms the structure of the loaf. The exact amount may vary slightly depending on the flour and how accurately it’s measured.
- Extra flour: Used for adjusting the dough consistency and dusting the parchment and loaf.
How to Make Dutch Oven No-Knead Crusty Bread
Mix the Dough
In a large bowl or container, combine the warm water, yeast, and salt.
Whisk until the yeast and salt are fully or almost dissolved.
Add the flour all at once and stir until a sticky dough forms. You don’t need to knead it or work it extensively. Just make sure all of the flour is evenly moistened.
The dough should be sticky and somewhat messy. If it seems excessively wet compared with a thick, sticky dough, add 1–2 tablespoons of flour at a time. If it seems unusually dry, add a little more water.
Let the Dough Rise
Cover the bowl with a kitchen towel or loosely cover the container, leaving room for air and gas to escape.
Allow the dough to rise in a warm place for 2–3 hours, or until it has approximately doubled in volume.
If your kitchen is cold, you can briefly warm the oven, turn it off, and place the covered bowl inside. The goal is simply to give the yeast a comfortably warm environment.
Preheat the Dutch Oven
About 30–60 minutes before you’re ready to bake, preheat the oven to 450°F.
Place the Dutch oven inside with the lid on while the oven heats. Once the oven reaches 450°F, allow it to continue heating for another 20 minutes so the Dutch oven becomes thoroughly hot.
If your Dutch oven manufacturer advises against preheating an empty enameled pot, follow the manufacturer’s instructions instead.
Shape the Dough
Dust a piece of parchment paper with flour.
Use a silicone spatula to scrape the sticky dough onto the parchment. Fold the edges of the dough toward the center to create a rough loaf shape.
You don’t need to make it perfectly smooth. The dough will naturally develop character and texture as it bakes.
Use the parchment paper to help flip the loaf so the floured side is facing upward and the loaf is centered.
Score the Loaf
This step is optional, but scoring allows the bread to expand in a controlled way while baking.
Use a very sharp knife or clean razor blade to make several shallow cuts about ½ inch deep across the top. A simple cross pattern works well.
Bake the Bread
Carefully remove the hot Dutch oven from the oven and remove the lid.
Using the parchment paper by its edges, carefully lower the loaf into the Dutch oven.
Replace the lid, making sure the parchment remains safely inside the pot.
Bake on the center rack at 450°F for 35 minutes. If you’re baking dough straight from the refrigerator, bake it covered for about 40 minutes instead.
Remove the lid and continue baking for another 5–10 minutes, or until the crust is a deep golden brown.
Cool Before Slicing
Carefully remove the bread from the Dutch oven using the parchment paper and transfer it to a wire rack or cutting board.
Allow it to cool for at least 10 minutes, but ideally 30 minutes to an hour before slicing.
It’s tempting to cut into a hot loaf immediately, but giving it time to cool allows the interior to finish setting. Cutting too early can result in a gummy or seemingly undercooked center.

Tips for Success
- Aim for the right dough consistency: The dough should be sticky, but not so wet that it resembles a liquid batter.
- Adjust the flour gradually: Different brands and types of flour absorb water differently, so add extra flour only as needed.
- Use warm, not hot, water: Water that’s too hot can damage or kill the yeast.
- Give the dough enough time to rise: It should roughly double in volume before baking.
- Don’t overwork the dough: This is a no-knead recipe, so simply mix until all the flour is incorporated.
- Get the Dutch oven very hot: A thoroughly preheated pot helps produce the signature crusty exterior.
- Don’t skip the cooling time: The inside continues to set as the loaf cools. Waiting longer helps prevent a gummy texture.
- Use good parchment paper: If your parchment tends to stick, lightly oil it or use a quality nonstick parchment rated for high temperatures.
- Watch the bottom crust: If the bottom becomes excessively hard, place a baking sheet on the lower oven rack to help deflect some of the intense heat.
- Don’t use too much flour when shaping: A light dusting is enough. Excess flour can leave a thick layer on the finished crust.
Equipment Needed
- Dutch oven
- Large mixing bowl or container
- Silicone spatula
- Parchment paper
- Sharp knife or bread lame
- Wire cooling rack
- Measuring cups and spoons
- Thermometer for accurately checking water temperature
Recipe Variations
Garlic and Herb No-Knead Bread
Add roasted garlic and your favorite chopped herbs to the dough before allowing it to rise. Rosemary, thyme, and parsley all work beautifully with the rustic bread.
Parmesan No-Knead Bread
Mix grated Parmesan cheese into the dough for a savory, cheesy variation. You can also sprinkle a little extra Parmesan over the loaf before baking.
Spicy Herb Bread
Add crushed red pepper flakes along with dried or fresh herbs for a loaf with a gentle kick.
Whole Wheat No-Knead Bread
Replace part of the all-purpose flour with whole wheat flour. You may need to adjust the water slightly because whole wheat flour absorbs more liquid.
Small No-Knead Loaves
Divide the dough into two smaller portions and bake them separately. Smaller loaves require less covered baking time, generally around 20–25 minutes, depending on their size.
Make-Ahead and Refrigerator Instructions
After the initial rise, you can store the dough in the refrigerator instead of baking it immediately.
Keep the container loosely covered or leave the lid slightly ajar so gases can escape. The dough can be refrigerated for up to 7 days.
Refrigerating the dough also makes the sticky dough easier to handle and allows the flavor to develop over time. After the first couple of days, the flavor may become increasingly complex.
For even easier handling, place the dough in the refrigerator for about 30 minutes before shaping and baking.
If baking the dough directly from the refrigerator, increase the covered baking time to approximately 40–45 minutes.
What to Do If Your Dough Isn’t Rising
If the dough doesn’t rise, the yeast may be old or inactive, or the water may have been too hot.
To test your yeast, combine 2¼ teaspoons yeast with 1½ cups warm water and ½–1 teaspoon sugar or honey. Let it sit for 5–10 minutes.
If the mixture becomes foamy and smells pleasantly yeasty, the yeast is active. If it remains flat, use a fresh batch of yeast.
What If You Don’t Have a Dutch Oven?
A Dutch oven is ideal because it traps steam around the bread, helping create a crisp crust.
However, you can bake the bread on a baking sheet or in a cast-iron skillet. To add steam, place a rimmed baking sheet or other oven-safe dish filled with some water on a lower oven rack while the bread bakes.
The crust may not be exactly the same as bread baked in a Dutch oven, but the method can still produce a delicious homemade loaf.
Serving Suggestions
This crusty homemade bread is incredibly versatile.
Serve thick slices alongside soups, stews, and chili, or use it to soak up sauces and hearty broths. It’s also excellent toasted with butter, olive oil, or your favorite spread.
Fresh bread makes a wonderful base for sandwiches, avocado toast, bruschetta, or simple open-faced lunches.
For breakfast, serve toasted slices with eggs, jam, or honey. And when the loaf is fresh from the oven, sometimes the simplest serving method is the best: tear off a warm piece and enjoy it with butter.
FAQs
Why is my no-knead bread so sticky?
No-knead dough is naturally very sticky because it contains a relatively high amount of water. However, if it’s excessively wet, add 1–2 tablespoons of flour at a time until it reaches the appropriate consistency.
Flour type, brand, and measuring technique can all affect the dough.
Can I use bread flour instead of all-purpose flour?
Yes. Bread flour works well in this recipe and may produce a slightly chewier loaf. You may need to make a small adjustment to the amount of water or flour depending on the specific brand.
Can I use instant yeast?
Yes. Active dry, instant, and quick-rise yeast can all be used according to the recipe.
How long can I keep the dough in the refrigerator?
The dough can be refrigerated for up to 7 days. Keeping it refrigerated also makes it easier to handle and can develop a more complex flavor.
Why is my bread gummy inside?
The most common reason is slicing the bread before it has cooled enough. The interior remains very steamy immediately after baking.
Allow the loaf to cool for at least 30 minutes, and preferably up to an hour, before slicing.
Can I freeze homemade no-knead bread?
Yes. For convenient use, slice the completely cooled loaf before freezing and place the slices in a zip-top freezer bag, removing as much air as possible.
You can also freeze a whole or half loaf tightly wrapped, but you’ll need to thaw it completely before slicing.
Final Thoughts
Dutch Oven No-Knead Crusty Bread makes homemade artisan-style bread surprisingly simple. With just a few basic ingredients, five minutes of preparation, and a little patience while the dough rises, you can create a loaf with a crisp golden crust and a soft, chewy interior.
The Dutch oven does most of the work, trapping steam and giving the bread its signature bakery-style crust. Once you’ve made it a few times, try adding roasted garlic, herbs, Parmesan, or other favorite ingredients to create your own variations.
Whether served alongside a cozy bowl of soup or enjoyed warm with butter, this easy no-knead bread is a recipe you’ll want to make again and again.
Print
Dutch Oven No-Knead Crusty Bread
- Total Time: 2 hours 45 minutes
- Yield: 8 servings
Description
This Dutch Oven No Knead Bread recipe comes out perfectly crusty in under 3 hours. It’s an easy way to make homemade artisan bread with only 5 minutes of prep!
Ingredients
- 1 1/2 cups warm water, about 100°F
- 1 packet yeast, active dry, instant, or quick rise (2.25 teaspoons)
- 1 1/2 teaspoons fine grain salt
- 3 1/4 cups all-purpose flour or bread flour, plus more for dusting
Instructions
- In a large bowl or container, mix the warm water, yeast, and salt until the yeast and salt are fully or almost dissolved.
- Add the flour all at once and stir until a sticky dough forms. Mix just until everything is uniformly wet. If the dough seems too wet, add 1–2 tablespoons more flour at a time. If it seems too dry, add a little more water.
- Cover the bowl with a kitchen towel or place the container lid on ajar. Let the dough rise for 2–3 hours in a somewhat warm place, until it has doubled in volume.
- After the dough has doubled, either bake it immediately or refrigerate it for later use.
- 30 minutes to 1 hour before baking, preheat the oven to 450°F. Place the Dutch oven inside with the lid on while the oven preheats. Once the oven reaches 450°F, continue heating for another 20 minutes.
- Scrape the dough onto a piece of parchment paper dusted with flour. Use a silicone spatula to fold the edges of the dough up and over itself to form a loaf shape.
- Use the edges of the parchment paper to flip the loaf so the floured side is on top and center it on the parchment. Optionally, use a very sharp knife or clean razor blade to cut a few 1/2-inch-deep slits across the top.
- Carefully remove the preheated Dutch oven and take off the lid. Grab the parchment paper by the sides and place the loaf inside the Dutch oven.
- Place the lid back on, making sure the parchment is tucked inside. Bake on the center rack for 35 minutes at 450°F, or 40 minutes if the dough was cold from the refrigerator.
- Remove the lid and bake for another 5–10 minutes, until the bread is golden brown. Remove the loaf from the Dutch oven and place it on a wire rack or cutting board. Allow it to cool for at least 10 minutes, preferably 30 minutes to 1 hour, before slicing.
Notes
- The recipe now uses 1 1/2 teaspoons salt, which is the same amount as the previously listed 1/2 tablespoon.
- If the dough is too wet or dry, adjust it with small amounts of flour or water depending on the consistency.
- To make two smaller loaves, divide the dough in half and bake each for about 20–25 minutes covered before uncovering and browning.
- Fine sea salt, Himalayan salt, or other fine-grain salts can be used. Kosher or coarse sea salt can also be used; use about 2 teaspoons.
- Iodized salt can be used if necessary, but it may impart a slightly bitter taste and can potentially slow yeast growth.
- Allow the bread to cool longer before slicing to avoid a gummy or seemingly undercooked interior.
- If the bottom crust becomes too hard, place a baking sheet on the bottom rack to help divert some heat from the Dutch oven.
- Some enameled cast iron Dutch ovens should not be preheated empty. If concerned, place the dough into a cold Dutch oven and bake for 5–10 minutes longer covered.
- For refrigerated dough, leave the container slightly open at first so gases can escape. The dough can be refrigerated for up to 7 days and develops more flavor over time.
- Cold dough is easier to handle. Refrigerate it for about 30 minutes after rising if desired.
- If baking dough directly from the refrigerator, bake covered for 40–45 minutes instead of 35 minutes.
- If you don’t have a Dutch oven, bake the bread on a baking sheet or in a cast iron skillet. Place an oven-safe dish with water on the lower rack to create steam.
- Freeze baked bread after it has completely cooled. Slice it first and store it in a zip-top bag, or freeze a whole or half loaf tightly wrapped.
- A 5.5-quart oval or 6-quart round Dutch oven works well, but slightly smaller or larger Dutch ovens can also be used.
- Crumpling the parchment paper before using it helps it fit the shape of the Dutch oven.
- If the bread sticks to parchment, use a higher-quality parchment paper or lightly brush or spray the parchment with oil.
- Use parchment paper rated for high temperatures, preferably up to 450°F when baking at this temperature.
- Brush away excess flour from the outside of the loaf before baking or lightly spritz the loaf with water to encourage crust blisters.
- For dry dough, add a little more water until the dough becomes looser and sticky.
- At high altitude, adding about 1 tablespoon more water and keeping the towel damp during rising may help.
- Feel free to add ingredients such as herbs, roasted garlic, or Parmesan cheese before the dough rises.
- If the dough does not rise, check that the yeast is fresh and that the water is not too hot. To test yeast, mix it with warm water and a little sugar or honey and wait 5–10 minutes for it to become foamy.
- Prep Time: 5 minutes
- Cook Time: 40 minutes
- Category: Bread
- Method: Oven
- Cuisine: American