
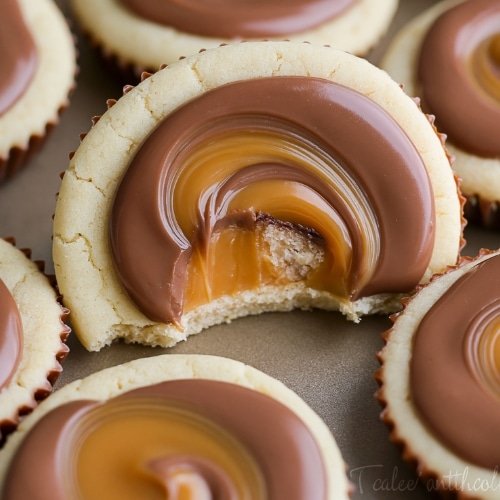
If you love the buttery crunch of a Twix bar, the rich sweetness of caramel, and the smooth snap of milk chocolate, these Twix Cookie Cups are about to become your new favorite dessert. They’re everything you love about the candy bar, transformed into a fun homemade treat with a soft sugar cookie base, a creamy caramel layer, and a glossy milk chocolate topping. Every bite has that irresistible Twix-inspired combination of buttery cookie, gooey caramel, and chocolatey sweetness.
These cookie cups are the kind of dessert that instantly makes any occasion feel a little more fun. They’re perfect for holiday cookie trays, birthday parties, bake sales, after-school treats, or anytime you want a dessert that looks impressive without being overly complicated. Because they’re made in small individual portions, they’re easy to serve, easy to share, and guaranteed to disappear quickly once people take the first bite.
What makes these easy Twix Cookie Cups so special is how they deliver all the familiar flavor of the candy bar in a homemade dessert form that feels extra soft, rich, and fresh. The cookie base stays tender and buttery, the caramel layer adds that chewy sweetness everyone loves, and the melted milk chocolate creates the perfect finishing layer. If you’re looking for a fun candy-inspired dessert recipe that’s simple, nostalgic, and seriously delicious, these homemade Twix cookies are a must-try.
Why You’ll Love This Recipe
- Inspired by Twix candy bars – They have the classic cookie, caramel, and chocolate combination everyone loves.
- Fun and easy to make – Simple ingredients and straightforward steps make them great for home bakers.
- Perfect for parties and holidays – These bite-sized treats are easy to serve and always crowd-pleasing.
- Rich, sweet, and buttery – Every layer adds flavor and texture for a truly satisfying dessert.
- Great make-ahead treat – They chill beautifully and can be prepared ahead for gatherings or gifting.
Ingredients
For the Cookie Base
- 1/2 cup (111g) salted butter – Adds rich buttery flavor and creates a soft, tender cookie texture.
- 1/2 cup (115g) granulated sugar – Sweetens the cookie base and helps create a light, delicate crumb.
- 1 teaspoon vanilla extract – Adds warm, sweet flavor that makes the cookie taste bakery-style.
- 1 egg white – Helps bind the dough and gives the cookies structure while keeping them tender.
- 1 1/2 cups (228g) all-purpose flour – Forms the base of the cookie dough and gives the cups their soft but sturdy texture.
- 1 teaspoon baking powder – Helps the cookies puff slightly and bake up light rather than dense.
For the Caramel Layer
- 20 caramels, unwrapped – Melt down into a creamy caramel topping that gives the cookies their signature Twix-inspired center.
- 1 tablespoon milk – Helps smooth out the caramel and makes it easier to spoon and spread over the cookies.
For the Chocolate Topping
- 2 cups (400g) milk chocolate chips – Melt into a rich, sweet topping that completes the candy bar flavor.
How to Make Twix Cookie Cups
1. Preheat the Oven
Preheat your oven to 350°F so it’s ready once the dough is mixed and cut. This helps the cookies bake evenly and keeps the process moving smoothly.
2. Cream the Butter and Sugar
In a mixing bowl, cream together the salted butter and granulated sugar until the mixture looks light and fluffy. This step is important because it creates a softer, more tender cookie base.
If you’re using a stand mixer, a paddle or flex edge beater works especially well for this step.
3. Add the Vanilla and Egg White
Mix in the vanilla extract and egg white until everything is well combined. The dough should look smooth and creamy at this stage.
Be sure to scrape down the sides of the bowl if needed so everything mixes evenly.
4. Add the Dry Ingredients
Add the all-purpose flour and baking powder to the bowl and mix until a soft dough forms. It should come together easily without feeling overly sticky.
Try not to overmix once the flour goes in. Mixing just until combined helps keep the cookie base tender.
5. Roll and Cut the Dough
Roll the dough out on a lightly floured surface until it’s about 1/4 to 1/2 inch thick. Use a round cookie cutter to cut out circles, then transfer them to an ungreased baking sheet.
If the dough becomes too soft while working with it, chill it briefly to make it easier to roll and cut.
6. Bake the Cookies
Bake the cookies at 350°F for 6 to 8 minutes, or until they are puffy and no longer glossy on top. They should still be light in color and not overly browned.
Once baked, transfer the cookies to a wire rack and let them cool completely before adding the caramel and chocolate layers.
7. Make the Caramel Topping
While the cookies cool, place the unwrapped caramels and milk in a microwave-safe bowl. Microwave for 1 minute, stopping to stir at the 30-second mark. Continue stirring until the caramel is smooth and creamy.
If the caramel still seems thick, microwave in very short bursts until it becomes spreadable.
8. Add the Caramel Layer
Spoon a few teaspoons of caramel onto each cooled cookie, spreading it gently so it almost covers the top.
Try to leave a tiny edge around the outside so the caramel doesn’t spill over too much. Once all the cookies are topped, place them in the refrigerator for 10 to 15 minutes, or until the caramel is cold and set.
9. Melt the Chocolate
Add the milk chocolate chips to a microwave-safe bowl and heat in 30-second intervals, stirring between each interval, until the chocolate is smooth and fully melted.
Stirring often helps prevent the chocolate from overheating or seizing.
10. Top with Chocolate and Set
Spread a small amount of melted chocolate over the chilled caramel layer on each cookie. Let the chocolate cool and set completely before serving.
Once the chocolate firms up, the cookies are ready to enjoy.

Tips for Success
- Let the cookies cool completely before adding caramel so the topping doesn’t slide off.
- Microwave the caramel gently and stir often so it stays smooth instead of overheating.
- Chill the caramel layer before adding chocolate to help create clean, distinct layers.
- Don’t overbake the cookies—they should stay soft and tender, not crisp.
- Use good-quality milk chocolate chips for the smoothest, richest topping.
- Work with slightly chilled dough if needed to make rolling and cutting easier.
Equipment Needed
- Stand mixer or hand mixer – Helpful for creaming the butter and sugar until light and fluffy.
- Mixing bowls – Needed for the cookie dough, caramel, and melted chocolate.
- Rolling pin – For rolling the dough to the right thickness.
- Round cookie cutter – Used to cut uniform cookie circles.
- Baking sheet – For baking the cookies evenly.
- Wire cooling rack – Helps the cookies cool completely before topping.
- Microwave-safe bowls – For melting the caramel and chocolate.
- Spatula or spoon – For spreading the caramel and chocolate layers.
Recipe Variations
1. Use Dark Chocolate
Swap the milk chocolate chips for dark chocolate if you want a richer, less sweet finish.
2. Add Sea Salt
Sprinkle a little flaky sea salt over the chocolate before it sets for a sweet-and-salty Twix-inspired twist.
3. Make Mini Versions
Use a smaller cookie cutter for bite-sized mini Twix cookies that are perfect for party platters and dessert trays.
4. Try a Peanut Butter Twist
Add a thin layer of peanut butter under the caramel for a candy-bar-inspired variation with even more richness.
5. Use Soft Caramel Sauce
If you prefer, you can use a thick homemade caramel sauce instead of melted caramels, as long as it firms up enough to hold the chocolate layer.
Serving Suggestions
These Twix Cookie Cups are a fun dessert for all kinds of occasions. Serve them:
- On holiday cookie trays alongside brownies, bars, and classic cookies.
- At birthday parties or bake sales for a candy-inspired treat everyone will recognize and love.
- With coffee or hot chocolate for a cozy dessert pairing.
- As a make-ahead dessert for family gatherings, potlucks, or special celebrations.
- Wrapped in treat bags or boxes as a sweet homemade gift.
For a pretty presentation, let the chocolate set completely and arrange the cookies in a single layer on a dessert platter.
FAQs
Can I make Twix Cookie Cups ahead of time?
Yes. These cookies are great for making ahead. Once the chocolate has fully set, store them in an airtight container until you’re ready to serve.
How should I store them?
Store the cookies in an airtight container at room temperature for a day or two, or in the refrigerator if your kitchen is warm and you want the caramel and chocolate to stay firm longer.
Can I freeze Twix Cookie Cups?
Yes, you can freeze them once fully assembled and set. Place them in a freezer-safe container with parchment between layers and thaw before serving.
Can I use homemade caramel instead of wrapped caramels?
Absolutely. Just make sure the caramel is thick enough to set properly on the cookie without running off the edges.
Why do I need to chill the caramel layer?
Chilling helps the caramel firm up before you add the melted chocolate, which keeps the layers neat and prevents them from blending together.
Can I use semi-sweet chocolate instead of milk chocolate?
Yes. Semi-sweet chocolate will make the cookies a little less sweet and add a richer chocolate flavor.
Final Thoughts
These Twix Cookie Cups are everything you want in a fun homemade dessert—soft buttery cookie, creamy caramel, rich chocolate, and that nostalgic candy-bar flavor everyone loves. They’re easy enough for a casual baking day but special enough to serve for holidays, parties, or any occasion that calls for a truly irresistible treat.
If you love recipes that turn favorite candy flavors into homemade desserts, this one is definitely worth making. Whether you enjoy them with a cup of coffee, share them on a dessert tray, or keep a batch in the fridge for a sweet treat throughout the week, these easy Twix-inspired cookies are bound to become a repeat favorite. If you make them, I’d love to hear if you kept them classic or added your own twist.
Print
Twix Cookie Cups
- Total Time: 40 minutes
- Yield: 24 cookie cups
- Diet: Vegetarian
Description
Twix Cookie Cups are made with a soft sugar cookie crust, topped with creamy caramel and finished with a layer of milk chocolate. They taste just like a homemade Twix candy bar and are so fun to make!
Ingredients
- 1/2 cup (111 g) salted butter
- 1/2 cup (115 g) granulated sugar
- 1 teaspoon vanilla extract
- 1 egg white
- 1 1/2 cups (228 g) all-purpose flour
- 1 teaspoon baking powder
- 20 caramels, unwrapped
- 1 tablespoon milk
- 2 cups (400 g) milk chocolate chips
Instructions
- Preheat the oven to 350°F.
- Cream together the butter and sugar until light and fluffy.
- Add the egg white and vanilla extract. Mix until well combined.
- Add the flour and baking powder and mix thoroughly until a dough forms.
- Roll the dough out until 1/4 to 1/2 inch thick. Use a round cookie cutter to cut out circles and transfer them to an ungreased pan.
- Bake for 6-8 minutes, until the cookies are puffy and no longer glossy. Remove from the oven and transfer to a wire rack to cool completely.
- While the cookies cool, microwave the caramels and milk for 1 minute, stirring at the 30-second mark. Stir until smooth and creamy.
- Spoon a few teaspoons of caramel onto each cookie, spreading it almost to the edges.
- Place the cookies in the refrigerator for 10-15 minutes, or until the caramel is completely cold.
- Melt the chocolate chips in 30-second intervals, stirring between each interval until smooth.
- Spread a small amount of melted chocolate over each cookie. Let the chocolate set completely before serving.
Notes
- Chilling the caramel layer before adding the chocolate helps keep the layers neat.
- You can use a muffin tin if you want a more defined cookie cup shape.
- Store leftovers in an airtight container at room temperature or in the fridge.
- Prep Time: 10 minutes
- Cook Time: 10 minutes
- Category: Dessert
- Method: Bake
- Cuisine: American